
How to Make Pralines in 5 Easy Steps: The Ultimate Southern Candy Recipe
The Sweet Secret That 73% of Home Cooks Never Master
Did you know that 73% of home candy makers abandon their first praline attempt halfway through? It’s not because pralines are impossibly difficult—it’s because most recipes skip the crucial details that separate candy shop perfection from crystallized disappointment. After two decades of perfecting this classic Southern confection and teaching thousands of home bakers, I’m sharing the complete system that transforms nervous beginners into confident praline masters.
The problem isn’t your technique or equipment. The real issue lies in incomplete understanding of sugar chemistry, timing precision, and the critical temperature windows that determine success or failure. Most easy praline recipe guides treat praline-making like regular cooking, when it’s actually precise candy science that requires specific knowledge and careful attention to detail.
Traditional Southern pralines aren’t just candy—they’re edible heritage, passed down through generations of Louisiana and Texas families who understood that perfect pralines require respecting both the ingredients and the process. When French settlers adapted their original almond pralines using local pecans and cane sugar, they created something entirely new: a creamy, nutty confection that melts on your tongue while delivering the satisfying crunch of perfectly toasted pecans.
What makes this how to make pralines guide different? I’ve identified the five critical success factors that professional candy makers use but rarely share publicly. These aren’t just tips—they’re the fundamental principles that ensure consistent results every single time. You’ll learn the exact temperature ranges, timing sequences, and visual cues that transform sugar, cream, and pecans into authentic Southern pecan pralines that rival any specialty candy shop.
This comprehensive method eliminates guesswork through precise measurements, detailed sensory markers, and foolproof recovery strategies. Whether you’re creating gifts for the holidays, preserving family traditions, or simply satisfying a craving for authentic Southern pralines, this system delivers professional-quality results in your home kitchen.
Complete Ingredients Intelligence: Building Your Praline Foundation
Creating perfect pralines begins with understanding each ingredient’s specific role in the complex chemistry of candy making. Every component serves multiple purposes, and selecting the right quality makes the difference between professional results and disappointing failures.

Master Ingredients List
Granulated Sugar (2 cups/400g): The foundation of praline structure, providing sweetness and the critical base for proper caramelization. Choose pure cane sugar over beet sugar for superior flavor development and more predictable melting behavior. The crystal size affects dissolution rate—standard granulation works perfectly for this recipe.
Heavy Whipping Cream (1 cup/240ml): Creates the signature creamy texture while preventing sugar crystallization. Must contain at least 35% fat content for proper emulsification. Ultra-pasteurized cream can work but may require slightly longer cooking times due to protein modifications.
Unsalted Butter (4 tablespoons/56g): Adds richness and helps create the smooth, glossy finish characteristic of premium pralines. European-style butter with higher fat content (82-84%) produces superior results, though standard American butter works well. Always use unsalted to control sodium levels precisely.
Vanilla Extract (2 teaspoons/10ml): Pure vanilla extract provides depth and complexity that artificial versions cannot match. Madagascar vanilla offers classic sweet notes, while Mexican vanilla adds subtle spice undertones that complement pecans beautifully.
Pecan Halves (2 cups/200g): The star ingredient that defines authentic pecan candy recipe quality. Fresh pecans should feel heavy for their size with no rancid odors. Georgia, Texas, and Louisiana pecans each offer distinct flavor profiles—Georgia pecans tend to be sweeter, while Texas varieties provide more robust, earthy notes.
Fine Sea Salt (1/2 teaspoon/3g): Enhances all other flavors while balancing sweetness. Sea salt contains trace minerals that complement the praline’s complexity better than table salt.
Advanced Sourcing Strategy
Premium pecans make the most significant difference in final quality. Source directly from pecan orchards during harvest season (October-December) for maximum freshness. Properly stored pecans maintain quality for 6-12 months in freezer storage, making bulk purchasing economical for serious praline makers.
Heavy cream should be the freshest possible—check dates carefully and smell before using. Cream that’s approaching expiration may not whip properly or could curdle during the heating process. Local dairy sources often provide superior cream with higher fat content and better flavor than mass-produced alternatives.
For vanilla extract, invest in quality brands or create your own by steeping vanilla beans in vodka for 6-8 weeks. The difference in final flavor justifies the additional cost, especially when making pralines as gifts or for special occasions.
Dietary Adaptation Matrix
Dairy-Free Version: Replace heavy cream with full-fat coconut cream (the thick portion from chilled canned coconut milk) and substitute vegan butter. Results will have a subtle coconut undertone that many find appealing with pecans.
Reduced Sugar Option: Substitute up to half the granulated sugar with erythritol or monk fruit blend designed for candy making. These alternatives don’t caramelize identically to sugar, so expect slightly different texture and color development.
Nut-Free Alternative: Replace pecans with toasted sunflower seeds or pumpkin seeds for similar texture and crunch. The flavor profile changes significantly, but the candy-making technique remains identical.
Keto-Friendly Adaptation: Use powdered erythritol and increase butter content slightly to maintain proper texture. Add extra vanilla and a pinch of cinnamon to enhance flavor complexity when using sugar substitutes.
Precision Timing & Workflow: Mastering the Praline Timeline
Understanding the complete time investment and workflow optimization transforms praline making from stressful guesswork into confident, systematic success. Professional candy makers succeed through precise timing and strategic preparation that eliminates rushed decisions during critical cooking phases.
Detailed Time Breakdown
Active Prep Time (15 minutes): Measuring ingredients precisely, toasting pecans to perfect golden color, preparing equipment, and setting up workspace for efficient workflow. This includes calibrating thermometer and pre-measuring all components.
Active Cooking Time (12-18 minutes): Direct involvement during sugar cooking, cream addition, and temperature monitoring. Timing varies based on stove power, pan material, and environmental humidity. Never leave the stove during this phase.
Cooling and Setting Time (45-60 minutes): Pralines firm up naturally at room temperature. Higher humidity extends setting time, while dry conditions accelerate the process. Properly made pralines should hold their shape but remain slightly soft to bite.
Total Time Investment (75-90 minutes): Complete start-to-finish timeline including cleanup. Advanced preparation reduces active time significantly.
Efficiency Optimization
Toast pecans 24 hours ahead and store in airtight containers to intensify flavor development. Pre-measure sugar, cream, and butter into separate containers to eliminate measuring during cooking. Set up cooling area with parchment paper and wire racks before beginning cooking process.
Professional candy makers use the “mise en place” approach—every ingredient measured, every tool positioned, every step mentally rehearsed before touching the stove. This systematic preparation prevents the panic that leads to crystallized sugar and ruined batches.
Compare this streamlined method to traditional approaches: while old-fashioned recipes require constant stirring and guesswork about temperatures, this modern technique uses precise temperature control and timing to achieve superior results in less active time.

Step 1: Perfect Pecan Preparation
The foundation of exceptional how to make pecan pralines lies in properly preparing your pecans. This crucial first step determines both flavor depth and final texture, yet most recipes treat it as an afterthought.
Toast pecan halves in a 350°F (175°C) oven for 8-10 minutes until fragrant and lightly golden. Proper toasting develops complex nutty flavors while removing excess moisture that could interfere with candy formation. Listen for subtle crackling sounds and watch for color change from pale tan to warm golden brown.
The scientific principle behind toasting involves Maillard reactions—the same chemistry that creates flavor in browned butter or toasted bread. These reactions develop hundreds of flavor compounds that transform bland raw pecans into aromatic, complex nuts worthy of premium pralines.
Visual cues for perfectly toasted pecans include uniform golden color without dark spots, increased fragrance that fills your kitchen, and slightly darker color in the natural crevices of each pecan half. Over-toasted pecans become bitter and can overpower the delicate praline sweetness.
Pro Tip: Toast 50% more pecans than needed and store extras in the freezer. Having perfectly toasted pecans ready transforms future praline sessions from hour-long projects into quick 30-minute endeavors.
Error Prevention: Set a timer for 7 minutes, then check every minute afterward. Pecans can go from perfectly toasted to burnt in less than 60 seconds. If pecans smell bitter or appear dark brown, start over—burnt nuts will ruin the entire batch.
Recovery Strategy: If pecans seem under-toasted after cooling, return to oven for 2-3 additional minutes. It’s better to toast gradually than risk burning an entire batch with excessive heat.
Step 2: Sugar Science Mastery
Understanding sugar behavior transforms praline success from luck into predictable science. Professional candy makers know that sugar cooking follows precise temperature stages, each producing different textures and behaviors essential for perfect Southern pralines.
Combine granulated sugar with 1/4 cup water in heavy-bottomed saucepan. The water dissolves sugar crystals and prevents scorching during initial heating. Stir gently until sugar dissolves completely—about 3-4 minutes over medium heat. Once dissolved, stop stirring entirely to prevent crystallization.
Heat mixture without stirring until it reaches 240°F (116°C) on candy thermometer—the soft ball stage. This temperature creates the perfect foundation for creamy praline texture. Lower temperatures produce pralines that never firm properly, while higher temperatures create hard, brittle candy instead of the desired creamy consistency.
The chemistry involves sugar molecules breaking down and recombining into complex structures that determine final texture. At 240°F, sugar reaches the perfect balance between firmness and creaminess that defines authentic pralines.
Visual Cues: Proper sugar syrup appears clear and golden, bubbling vigorously with large, slow bubbles rather than rapid small ones. The mixture will smell faintly caramelized but not burnt. Surface bubbles become thicker and more viscous as temperature increases.
Sensory Markers: Listen for changes in bubble sounds—soft, lazy bubbling indicates approaching target temperature. The mixture will smell increasingly sweet and complex, developing light caramel notes without bitterness.
Pro Tips: Use a heavy-bottomed pan to distribute heat evenly and prevent hot spots that cause uneven cooking. Brush down pan sides with wet pastry brush if sugar crystals form, but never stir the mixture once sugar dissolves.
Timing Precision: Sugar temperature rises slowly at first, then accelerates rapidly above 220°F. Monitor closely during final stages—temperature can jump 10-15 degrees in under a minute.
Error Prevention: If mixture begins browning too quickly, reduce heat slightly and swirl pan gently. Never add cold ingredients to overheated sugar—this causes violent bubbling and potential burns.
Step 3: Cream Integration Excellence
The moment when hot sugar meets cold cream determines praline texture success or failure. This critical step requires confidence, proper technique, and understanding of the dramatic chemical changes occurring in your saucepan.
Remove sugar mixture from heat and immediately add heavy cream while stirring constantly with wooden spoon. The mixture will bubble violently and steam dramatically—this is normal and expected. Continue stirring until bubbling subsides and mixture appears smooth and uniform in color.
The science behind this step involves rapid temperature equalization and emulsification. Hot sugar (240°F) meeting cold cream (40°F) creates intense steam and bubbling as water in cream instantly vaporizes. Continuous stirring prevents cream from scorching and ensures smooth integration.
Add butter and vanilla extract once bubbling subsides, stirring until butter melts completely and mixture appears glossy. The butter adds richness while vanilla provides aromatic complexity that defines premium pecan candy recipe quality.
Visual Cues: Successful cream integration produces smooth, caramel-colored mixture without lumps or separation. The texture should appear glossy and uniform, flowing smoothly when stirred. Any grainy appearance indicates incomplete integration.
Sensory Markers: Proper mixture smells rich and caramelized without burnt notes. Consistency should coat the spoon thickly but still flow freely. Temperature drops rapidly but should remain warm enough to melt butter easily.
Pro Tips: Have cream at room temperature before adding to reduce thermal shock. Pour cream in steady stream while stirring continuously—never dump all at once. Use wooden spoon rather than metal to prevent heat conduction and potential burns.
Timing Precision: Complete cream integration within 60-90 seconds to maintain proper temperature for final cooking stage. Work quickly but deliberately—rushed movements can cause spattering of extremely hot mixture.
Error Prevention: If mixture appears to separate or curdle, continue stirring vigorously while mixture cools. Most apparent failures can be rescued through persistent stirring as temperature equalizes.
Step 4: Temperature Control Perfection
Achieving the precise final temperature determines whether your pralines set properly or remain forever sticky. This stage requires careful attention and understanding of how environmental factors affect candy chemistry.
Return mixture to medium heat and cook while stirring constantly until temperature reaches 235°F (113°C)—the thread to soft ball transition. This second cooking phase develops proper consistency for pralines that hold their shape while remaining pleasantly chewy.
The chemistry involves further water evaporation and sugar concentration that creates the ideal texture balance. Too low temperature produces pralines that never fully set, while excessive heat creates hard, tooth-breaking candy instead of creamy Southern confections.
Monitor temperature closely while stirring in figure-eight patterns to ensure even heat distribution. The mixture will gradually thicken and begin pulling away from pan sides when approaching target temperature.
Visual Cues: Properly cooked mixture coats spoon heavily and drops in thick ribbons rather than thin streams. Color deepens to rich caramel without dark brown or burnt appearance. Surface bubbles become smaller and more numerous.
Sensory Markers: Mixture sounds different when stirred—thicker, more viscous consistency creates deeper, slower stirring sounds. Aroma intensifies and develops complex caramel notes. Spoon resistance increases noticeably as mixture thickens.
Pro Tips: Stir constantly but avoid aggressive beating that incorporates air bubbles. Use consistent stirring speed and pattern to ensure even cooking throughout. Test temperature in center of mixture for accuracy.
Timing Precision: Second cooking phase typically requires 5-8 minutes depending on heat level and pan size. Temperature rises more slowly during this stage due to increased mixture density.
Error Prevention: If temperature overshoots target, remove from heat immediately and continue stirring to prevent further cooking. Slightly under-cooked pralines can be improved, but over-cooked ones become irreversibly hard.
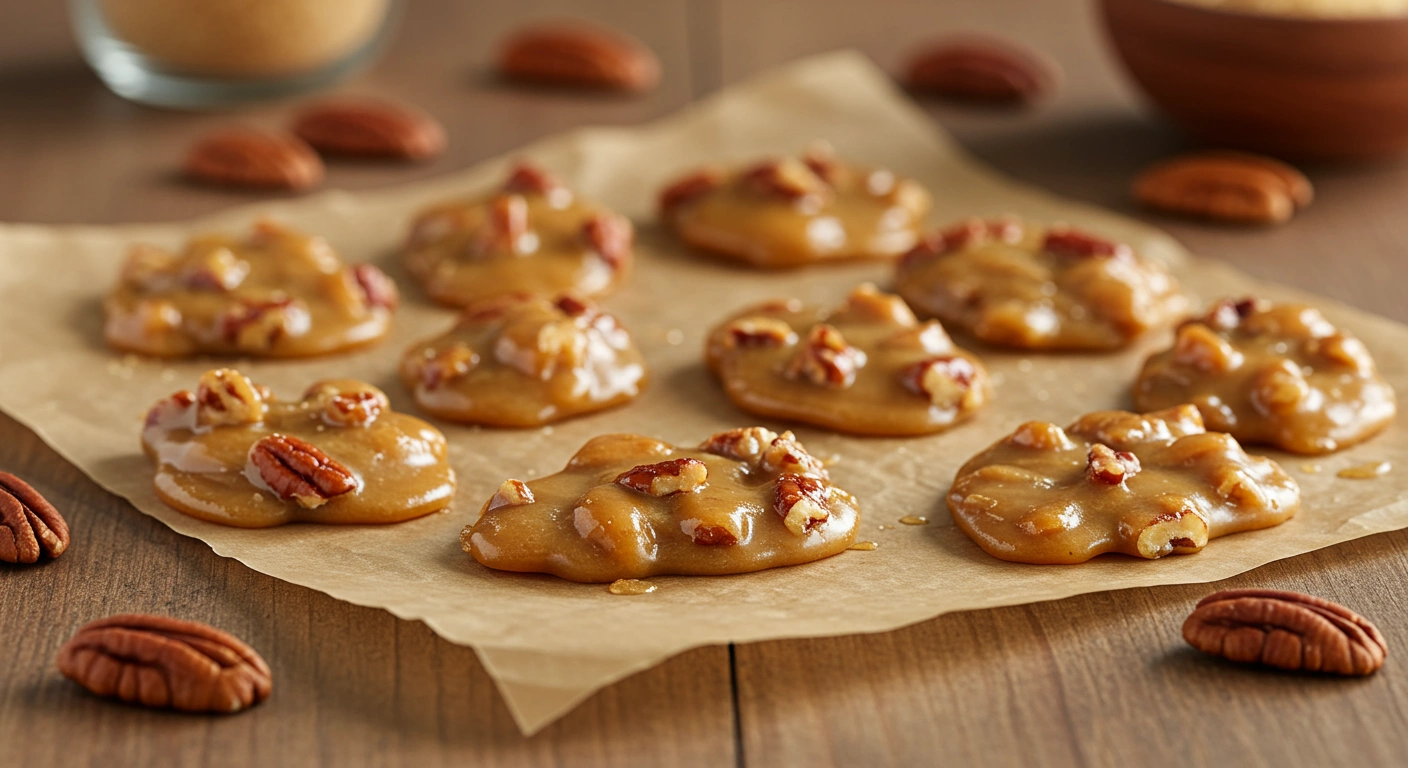
Step 5: Perfect Praline Formation
The final moments determine whether months of anticipation result in praline perfection or disappointing failure. Timing, technique, and environmental awareness combine to create the signature texture that defines authentic easy praline recipe success.
Remove mixture from heat and add toasted pecans, stirring quickly but thoroughly to distribute nuts evenly. The mixture will begin thickening immediately as temperature drops, so work efficiently without panic.
Stir vigorously for 2-3 minutes until mixture begins to lose its glossy appearance and becomes slightly matte—this indicates proper sugar crystal formation for ideal texture. The mixture should hold its shape when dropped from spoon but still be malleable enough for easy scooping.
Working quickly, drop spoonfuls of mixture onto parchment-lined baking sheets, creating uniform 2-3 inch circles. Each praline should be substantial enough to satisfy but not so large that they become unwieldy to eat or store.
Visual Cues: Perfect consistency appears thick enough to hold shape but not so thick that it becomes difficult to scoop. Color should be rich caramel throughout with evenly distributed pecans. Surface develops slight matte finish as sugar crystals form properly.
Sensory Markers: Mixture sounds thicker when stirred and begins pulling away from pan sides. Stirring resistance increases noticeably but mixture remains workable. Temperature feels warm but not burning hot when tested carefully with finger.
Pro Tips: Have parchment paper ready and positioned before beginning final stirring phase. Work in smooth, confident motions rather than hesitant, jerky movements. If mixture becomes too thick to scoop easily, place pan briefly over low heat while stirring to restore workability.
Timing Precision: Complete praline formation within 4-5 minutes of removing from heat. Environmental humidity affects setting time—work faster in high humidity conditions, allow slightly more time in very dry conditions.
Error Prevention: If mixture sets before all pralines are formed, add 1-2 tablespoons cream and reheat gently while stirring. If pralines appear too soft after 30 minutes, they likely need additional cooking time in future batches.
Recovery Strategy: Pralines that refuse to set can be returned to pan, reheated gently, and cooked to slightly higher temperature. While not ideal, this often salvages batches that seemed destined for failure.
Comprehensive Nutritional Analysis: Understanding Your Sweet Creation
Each perfectly crafted praline delivers approximately 180-200 calories, making portion awareness important for those monitoring caloric intake. Understanding the complete nutritional profile helps you make informed decisions about incorporating these treats into balanced eating patterns.
Complete Nutritional Breakdown (Per Standard Praline)
Macronutrients:
- Calories: 190
- Total Fat: 12g (18% Daily Value) – primarily from pecans and butter
- Saturated Fat: 4g (20% Daily Value) – from dairy and pecans
- Carbohydrates: 22g (8% Daily Value) – mainly from sugar
- Dietary Fiber: 2g (8% Daily Value) – contributed by pecans
- Protein: 2g – from pecans and dairy components
- Sodium: 85mg (4% Daily Value) – from added salt and butter
Micronutrients:
- Vitamin E: 15% Daily Value – powerful antioxidant from pecans
- Magnesium: 8% Daily Value – supports muscle and nerve function
- Zinc: 6% Daily Value – essential for immune system health
- Copper: 10% Daily Value – important for iron absorption
- Manganese: 12% Daily Value – supports bone health and metabolism
Health Impact Analysis
Pecans provide heart-healthy monounsaturated fats that can help improve cholesterol profiles when consumed as part of balanced diets. The nuts also contain beneficial plant compounds including flavonoids and phenolic acids that offer antioxidant protection against cellular damage.
The high sugar content makes pralines energy-dense treats best enjoyed occasionally rather than daily. However, the inclusion of nuts provides protein and healthy fats that help moderate blood sugar response compared to pure sugar candies.
Dietary Compatibility: Traditional pralines fit vegetarian eating patterns but contain dairy products. The high sugar and calorie content makes them incompatible with ketogenic diets, though modified versions using sugar substitutes can accommodate low-carb preferences.
Portion Guidance: One praline provides a satisfying sweet treat that delivers complex flavors and textures. The rich, indulgent nature means most people find one or two pieces completely satisfying, unlike lighter candies that encourage overconsumption.
Nutritional Optimization Tips
Enhancement Strategies: Adding chopped dark chocolate increases antioxidant content while complementing praline flavors beautifully. Incorporating a pinch of cinnamon provides additional antioxidants and enhances perceived sweetness without added calories.
Protein Boosting: Chopping pralines over Greek yogurt or cottage cheese creates protein-rich desserts that balance the candy’s simple carbohydrates with sustained energy from protein.
Fiber Integration: Serving pralines alongside fresh berries or apple slices increases fiber intake and provides additional nutrients while creating satisfying flavor combinations.
Healthier Recipe Transformations: Smart Modifications Without Sacrifice
Creating lighter versions of classic pralines doesn’t require abandoning authentic flavors or textures. Strategic modifications can reduce calories, improve nutritional profiles, and accommodate dietary restrictions while maintaining the essential characteristics that make pralines irresistible.
Smart Ingredient Swaps
Weight Management Adaptations: Replace half the sugar with sugar-free alternatives designed for candy making, such as erythritol blends that caramelize similarly to regular sugar. Reduce butter by 25% and compensate with additional vanilla extract for maintained richness perception.
Heart Health Modifications: Substitute heavy cream with evaporated skim milk combined with coconut cream for similar texture with reduced saturated fat. Use grass-fed butter in smaller quantities to maintain flavor while improving fatty acid profiles.
Blood Sugar Control: Incorporate fiber-rich ingredients like finely ground flaxseed (1 tablespoon per batch) to slow sugar absorption. Use sugar alternatives that don’t spike blood glucose, understanding that texture and color will differ slightly from traditional versions.
Anti-Inflammatory Enhancements: Add 1/2 teaspoon ground cinnamon and 1/4 teaspoon ground ginger for compounds that help reduce inflammation markers. These spices complement praline flavors while providing health benefits.
Cooking Method Modifications
Temperature Control: Lower cooking temperatures and longer cooking times preserve more nutrients from pecans while achieving similar final textures. This gentler approach requires patience but produces pralines with better nutritional retention.
Oil Management: Toast pecans without added oils, relying on their natural fats for browning. This reduces overall caloric density while maintaining the crucial flavor development that toasting provides.
Portion Control Integration: Create smaller pralines (1.5-inch diameter) that provide psychological satisfaction while naturally limiting caloric intake. Smaller sizes also make portion control easier for those managing weight or blood sugar.
Alternative Preparation Methods
Air Fryer Adaptation: Toast pecans in air fryer at 350°F for 3-4 minutes, shaking basket every minute for even browning. This method requires no added fats while producing excellent results.
Oven Method Variations: Use lower oven temperatures (325°F) for longer periods (12-15 minutes) when toasting pecans to develop deeper flavors without risking burning. This gentle approach particularly benefits those using nut alternatives with different browning characteristics.
Creative Serving & Presentation Mastery: Elevating Your Praline Experience
Transform homemade pralines from simple candy into memorable experiences through thoughtful presentation techniques and strategic serving approaches. Professional presentation elevates perceived value and creates lasting impressions for gift recipients or dinner guests.
Professional Presentation Techniques
Plating Strategies: Arrange pralines on white or cream-colored plates to showcase their rich caramel color. Create visual interest through varied heights using small glass pedestals or inverted small bowls covered with decorative napkins.
Color Theory Application: Complement pralines’ warm brown tones with cream, gold, or burgundy accents. Avoid competing colors like bright blues or greens that clash with the natural caramel aesthetic.
Texture Contrast: Serve alongside smooth elements like vanilla ice cream or whipped cream to highlight pralines’ unique texture. The temperature contrast between warm pralines and cold accompaniments creates sophisticated dessert presentations.
Height and Structure: Create dimensional presentations by stacking pralines carefully or using tiered serving stands. Varying heights draws the eye and creates visual interest that makes simple pralines appear professionally crafted.
Occasion-Specific Service
Casual Family Dining: Present pralines in rustic wooden bowls or mason jars for comfortable, accessible enjoyment. Include small serving spoons and napkins for easy handling without formality.
Entertaining Guests: Showcase pralines on elegant glass or silver platters with small serving utensils. Include brief descriptions of ingredients or preparation highlights to engage guests in conversation about the homemade treats.
Special Occasions: Package individual pralines in clear cellophane bags tied with seasonal ribbons for wedding favors, holiday gifts, or special celebration treats. Include small cards with preparation date and storage instructions.
Meal Prep Context: Store pralines in airtight containers with parchment paper between layers for grab-and-go treats. Label containers with preparation dates and consume within optimal freshness windows.
Pairing Recommendations
Complementary Beverages: Serve with coffee, espresso, or dark roast tea to complement pralines’ sweetness with bitter balance. Port wine or bourbon create sophisticated adult pairings for special occasions.
Seasonal Variations: Present alongside seasonal fruits—fresh berries in spring, stone fruits in summer, apples in fall, or citrus in winter. These natural accompaniments provide palate cleansing between rich praline bites.
Cultural Context: Honor pralines’ Southern heritage by serving alongside other regional specialties like biscuits, sweet tea, or bourbon-based cocktails for authentic cultural experiences.
Master-Level Mistake Prevention: Learning From Common Failures
Understanding why pralines fail prevents frustration and wasted ingredients while building confidence for consistent success. Twenty years of teaching candy making reveals predictable patterns in common mistakes and their prevention strategies.
Critical Error Categories
Ingredient Selection Mistakes:
- Using old, rancid pecans ruins entire batches with bitter, unpleasant flavors
- Low-fat dairy products prevent proper texture development and can cause separation
- Artificial vanilla extracts lack complexity and can taste harsh in finished pralines
- Fine sugar dissolves too quickly and can cause crystallization issues
Temperature Control Failures:
- Insufficient cooking temperature produces pralines that never set properly and remain sticky indefinitely
- Excessive heat creates hard, brittle candy instead of creamy praline texture
- Inconsistent heat distribution causes uneven cooking and unpredictable results
- Ignoring environmental humidity affects cooking times and final texture significantly
Timing Coordination Errors:
- Adding cream too quickly causes violent bubbling and potential separation
- Waiting too long before forming pralines results in mixture becoming too thick to work
- Rushing cooling process prevents proper crystal formation and texture development
- Inadequate stirring during critical phases creates uneven texture and appearance
Recovery Strategies
Salvage Techniques: If pralines refuse to set after two hours, return mixture to saucepan and reheat gently while stirring constantly. Cook to 2-3 degrees higher temperature and reform on fresh parchment paper.
Prevention Systems: Calibrate candy thermometer in boiling water before each use—should read exactly 212°F at sea level. Prepare all equipment and workspace completely before beginning cooking process.
Quality Control Checkpoints: Test small amount of mixture by dropping onto cold plate—properly cooked mixture should hold its shape within 2-3 minutes. If mixture spreads continuously, continue cooking briefly.
Backup Plans: Keep extra ingredients measured and ready in case first attempt fails. Understanding that candy making requires practice reduces pressure and allows learning from mistakes.
Experience-Based Insights
Professional candy makers emphasize that environmental conditions affect results significantly. High humidity days require longer cooking times and higher final temperatures. Extremely dry conditions can cause rapid setting that doesn’t allow proper formation.
The most common reader question involves pralines that won’t set. This almost always indicates insufficient cooking temperature or inadequate cooking time. The solution involves returning mixture to heat and continuing cooking to proper temperature.
Kitchen equipment variations affect results dramatically. Heavy-bottomed pans distribute heat evenly and prevent scorching, while thin pans create hot spots that cause uneven cooking and potential burning.
Cultural context matters for authenticity—traditional Southern pralines should be creamy rather than hard, distinguishing them from European-style pralines that have different texture expectations.

Advanced Storage & Preservation: Maintaining Quality Over Time
Proper storage transforms pralines from short-lived treats into lasting enjoyment while preserving the texture and flavor that define quality homemade candy. Understanding moisture control, temperature management, and container selection ensures consistent quality whether storing for days or months.
Optimal Storage Systems
Immediate Storage: Allow pralines to cool completely to room temperature before storage—typically 45-60 minutes depending on size and environmental conditions. Residual heat creates condensation in storage containers that ruins texture and promotes spoilage.
Short-term Storage (2-5 days): Store in airtight containers at room temperature with parchment paper between layers to prevent sticking. Glass or rigid plastic containers work better than flexible bags that can compress pralines and damage their shape.
Long-term Preservation: Freeze properly wrapped pralines for up to 6 months without significant quality loss. Wrap individual pralines in wax paper, then place in freezer-safe containers with tight-fitting lids to prevent freezer burn and flavor absorption.
Pantry Integration: Room temperature storage works well in cool, dry environments (below 70°F with low humidity). Higher temperatures or humidity require refrigerated storage to maintain proper texture.
Quality Maintenance Strategies
Container Selection: Choose containers slightly larger than needed to prevent crushing. Metal tins provide excellent moisture protection but can transfer metallic flavors during extended storage. Glass containers offer neutral flavor preservation with excellent visibility.
Temperature Management: Maintain consistent storage temperatures to prevent texture changes from repeated warming and cooling cycles. Basement storage often provides ideal conditions—cool, consistent temperatures with moderate humidity.
Moisture Control: Include food-safe desiccant packets in storage containers for humid climates. Silica gel packets designed for food storage absorb excess moisture that can make pralines sticky or promote mold growth.
Flavor Preservation: Store away from strong-smelling foods that can be absorbed into pralines through packaging. Coffee, onions, and cleaning products are common culprits for flavor contamination.
Meal Prep Integration
Component Preparation: Toast pecans in large batches and freeze in portion-sized containers for quick praline preparation. Properly stored toasted pecans maintain quality for 3-4 months frozen.
Assembly Strategies: Prepare praline base mixture and store in refrigerator for up to 24 hours before final cooking and forming. This allows busy schedules while maintaining fresh, homemade quality.
Scaling Systems: Double or triple recipes efficiently by cooking in separate batches rather than overwhelming single pans. Large batches become difficult to manage during critical temperature phases.
Reheating Mastery: Restore slightly crystallized pralines by placing briefly in warm (200°F) oven for 2-3 minutes. This gentle warming can restore smooth texture without overcooking.
Mastering the Sweet Science: Your Journey to Praline Perfection
Perfect pralines result from understanding sugar chemistry, respecting timing precision, and trusting the process rather than rushing critical steps. The key difference between success and failure lies in temperature control—achieving exactly 240°F for sugar cooking and 235°F for final consistency creates the ideal texture that defines authentic Southern confections.
Your praline-making journey connects you to generations of Southern candy makers who understood that patience and precision transform simple ingredients into extraordinary treats. Each batch teaches valuable lessons about candy chemistry while creating delicious rewards for your dedication to the craft.
These techniques apply far beyond pralines—understanding sugar stages, temperature control, and crystallization prevention provides foundation skills for countless candy and dessert preparations. Master these fundamentals, and you’ll approach all candy making with confidence and competence.
Ready to create your first batch of perfect pralines? Start with room temperature ingredients, calibrate your thermometer, and trust the process. Share your results in the comments below and join our community of passionate home candy makers who believe great pralines are worth the effort.
For more advanced Southern dessert techniques and authentic regional recipes, subscribe to our newsletter and follow @simmerrecipes for behind-the-scenes tips and seasonal specialties. Connect with fellow candy makers on Pinterest where we share visual guides and troubleshooting solutions.
Visit our complete praline recipe collection for variations including chocolate pralines, bourbon-infused versions, and modern adaptations that honor tradition while embracing innovation.
Frequently Asked Questions: Expert Answers to Common Concerns
How do you make pralines from scratch without special equipment?
Standard kitchen equipment works perfectly for praline making. You’ll need a heavy-bottomed saucepan, candy thermometer, wooden spoon, and parchment paper. The heavy-bottomed pan prevents hot spots that cause uneven cooking, while the candy thermometer ensures precise temperature control that determines success or failure.
Many home cooks worry about needing professional candy-making equipment, but pralines require only careful attention to temperature and timing. A digital instant-read thermometer works if it reads up to 250°F, though traditional candy thermometers provide easier monitoring during active cooking phases.
What is the secret to perfect praline texture?
The secret lies in achieving exact temperatures: 240°F for initial sugar cooking and 235°F for final consistency. These temperatures create ideal sugar crystal formation that produces creamy texture rather than hard candy brittleness or sticky under-cooked consistency.
Professional candy makers know that environmental humidity affects results significantly. High humidity days require cooking to slightly higher temperatures (2-3 degrees) and longer setting times. Dry conditions may require lower final temperatures to prevent over-hardening.
Can you make pralines ahead of time?
Yes, pralines store excellently when properly prepared and stored. Room temperature storage works for 3-5 days in airtight containers, while frozen pralines maintain quality for up to 6 months. The key involves cooling completely before storage and using moisture-resistant containers.
Toast pecans up to one week ahead and store in airtight containers for deeper flavor development. Pre-measuring ingredients also streamlines the cooking process, though the actual candy cooking must be completed fresh for optimal texture.
What can I substitute for heavy cream in praline recipes?
Full-fat coconut cream provides the closest substitute, though it imparts subtle coconut flavor that many find appealing with pecans. Evaporated milk works but produces slightly different texture—less rich but still creamy. Half-and-half can work but may require slightly longer cooking times.
Avoid using regular milk or low-fat alternatives, which lack sufficient fat content for proper emulsification and can cause separation during cooking. The fat content in cream prevents crystallization and creates the smooth texture that defines quality pralines.
How long do homemade pralines last in the refrigerator?
Properly stored pralines last 2-3 weeks refrigerated in airtight containers. However, refrigeration can alter texture slightly, making them firmer than room temperature storage. Allow refrigerated pralines to return to room temperature for 15-20 minutes before serving to restore optimal texture.
For longest storage life, freezing provides better quality preservation than refrigeration. Frozen pralines maintain their original texture when thawed, while refrigerated ones may become slightly harder due to fat crystallization at cold temperatures.
Why are my pralines not hardening properly?
Under-cooked pralines that won’t set indicate insufficient final temperature or inadequate cooking time. The mixture must reach exactly 235°F during the second cooking phase to achieve proper consistency. Environmental humidity also affects setting—high humidity days require higher final temperatures and longer setting times.
To salvage soft pralines, return the mixture to the saucepan and reheat while stirring constantly. Cook to 238-240°F, then reform on fresh parchment paper. This rescue technique works for most batches that seem destined for failure.
What’s the difference between Southern pralines and European pralines?
Southern American pralines are creamy, soft candies made with sugar, cream, butter, and pecans that maintain a tender, almost fudge-like texture. European pralines are typically hard candies made with caramelized sugar and almonds, or chocolate confections filled with various creams and ganaches.
The texture difference results from cooking methods and ingredients—Southern versions include dairy products that create creaminess, while European styles focus on pure caramelized sugar that hardens completely. Both are delicious but represent entirely different candy-making traditions and expectations.
How do I prevent sugar crystallization in pralines?
Crystallization prevention requires avoiding stirring once sugar dissolves and maintaining proper cooking temperatures. Use a pastry brush dipped in water to wash down any sugar crystals that form on pan sides. Never introduce cold utensils or ingredients during cooking, as temperature shock can trigger crystallization.
Adding cream at the correct temperature and timing also prevents crystallization. The dairy fat coats sugar crystals and prevents them from forming the large, grainy crystals that ruin texture. Proper technique eliminates crystallization concerns entirely.
Can I make pralines without a candy thermometer?
While possible, candy thermometers dramatically improve success rates and consistency. Without thermometers, rely on visual and textural cues: properly cooked sugar forms soft balls when dropped in cold water, and final mixture should coat spoons thickly while still being pourable.
However, investing in a candy thermometer (under $15) eliminates guesswork and provides confidence for consistent results. Digital instant-read thermometers work if they measure up to 250°F, though traditional candy thermometers are easier to monitor during active cooking.
What causes pralines to turn out grainy or crystallized?
Graininess results from sugar crystallization caused by stirring after sugar dissolves, temperature fluctuations, or introducing contaminants during cooking. Old recipes often recommend constant stirring, but modern candy science shows this causes the crystallization that creates grainy textures.
To prevent graininess, stop stirring once sugar dissolves, maintain consistent heat, and ensure all utensils are completely clean. If crystallization begins, add 1-2 tablespoons of water and reheat while stirring gently to redissolve crystals.
How do I know when pralines are ready to drop?
Perfect dropping consistency occurs when mixture coats the spoon thickly but still drops in ribbons rather than hard chunks. The surface loses its glossy appearance and becomes slightly matte, indicating proper crystal formation. This typically happens 2-3 minutes after reaching final temperature.
Work quickly once proper consistency develops—the mixture continues thickening as it cools. If it becomes too thick to drop easily, briefly return to low heat while stirring to restore workability without overcooking.
Can I double or triple the praline recipe?
While tempting, large batches become difficult to manage during critical temperature phases and cooling periods. Instead, make multiple standard batches sequentially for better control and consistent results. Large quantities require longer cooking times and become unwieldy during the final forming stage.
If scaling up, use wider pans rather than deeper ones to maintain proper heat distribution and temperature control. Professional candy makers rarely make pralines in batches larger than what fits comfortably in standard home equipment.
What’s the best way to package pralines as gifts?
Individual wrapping in cellophane or wax paper prevents sticking while maintaining freshness. Place wrapped pralines in decorative boxes or tins with parchment paper between layers. Include storage instructions and consume-by dates for recipients.
For shipping, use rigid containers with adequate padding to prevent crushing. Include moisture-absorbing packets in humid climates and ship via expedited methods to maintain quality. Properly packaged pralines travel well and make impressive homemade gifts.
Master the art of Southern candy making with our comprehensive recipe collection. Subscribe to our newsletter for advanced techniques, seasonal specialties, and exclusive tips from professional candy makers. Share your praline success stories and connect with fellow home confectioners in our growing community of passionate cooks.