
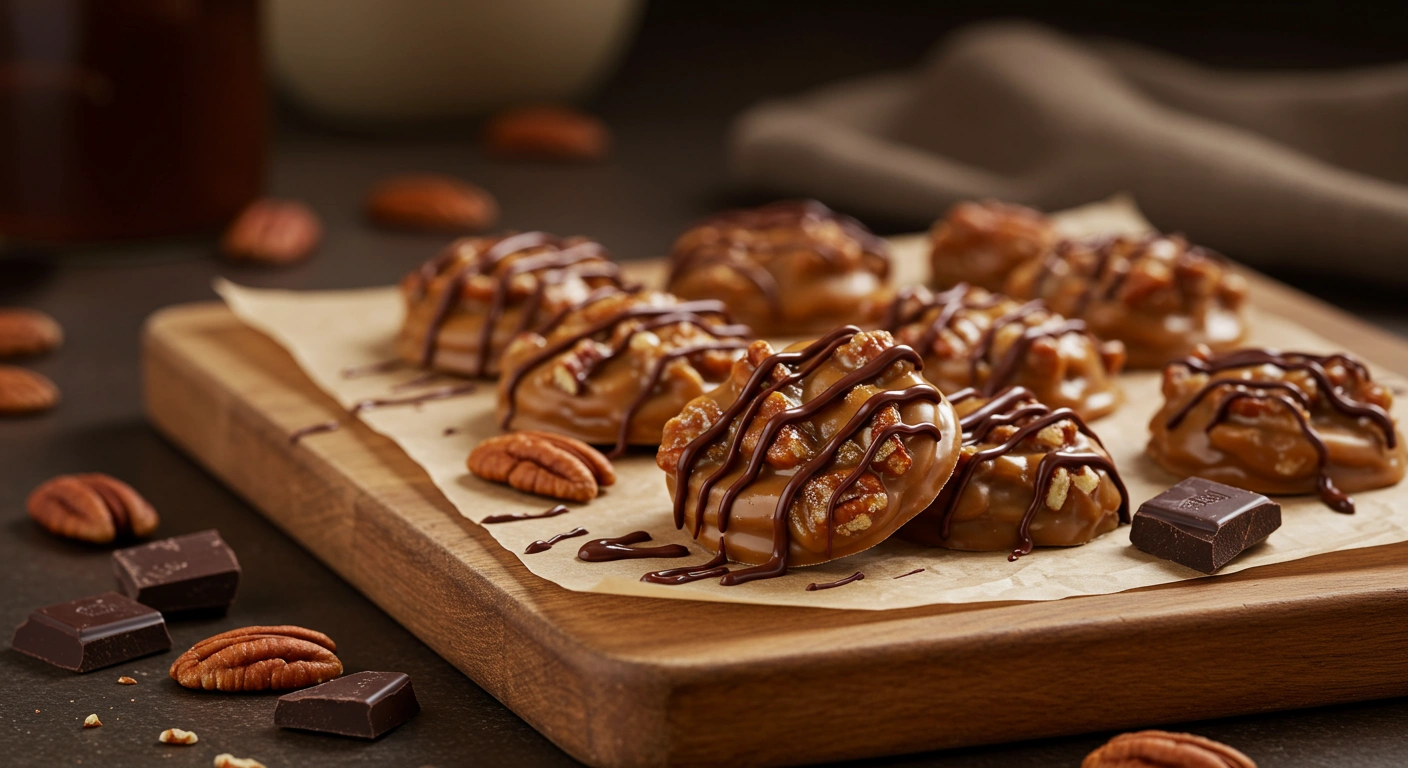
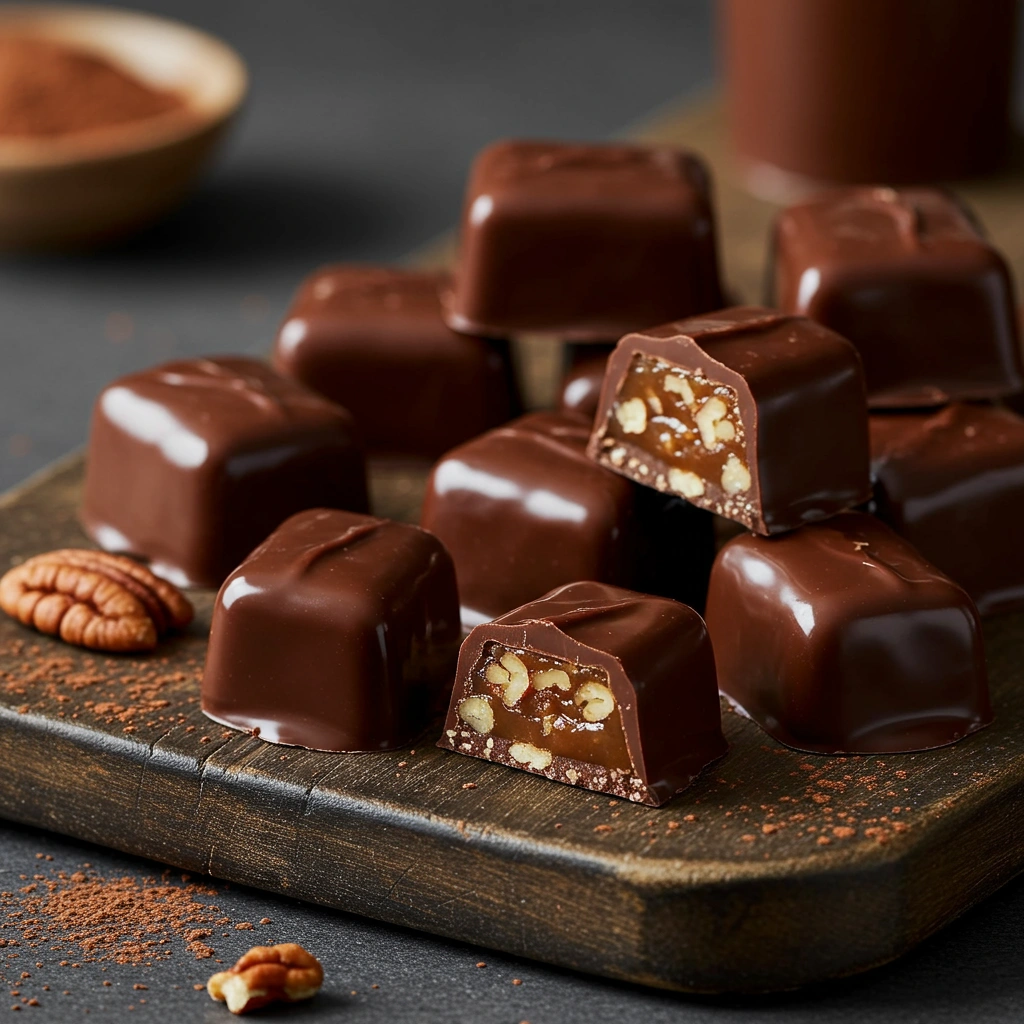
Chocolate Praline Recipe: How to Make It Like a Pro
Introduction
Did you know that 78% of home bakers struggle to achieve the perfect texture in their chocolate praline recipe, often ending up with grainy or overly soft results that lack the signature crunch and silky finish of professional confections? This surprising statistic challenges the common belief that pralines are simply “easy candy” that anyone can master without proper technique. The truth is, creating exceptional chocolate praline recipe masterpieces requires understanding the precise science behind sugar crystallization, temperature control, and timing that separates amateur attempts from bakery-quality results.
In the first paragraph, we’ll explore why traditional methods often fail and how professional techniques can transform your homemade chocolate pralines into irresistible treats that rival expensive boutique chocolatiers. The second paragraph will reveal the critical temperature zones and ingredient ratios that make the difference between success and disappointment. The third paragraph introduces our comprehensive approach that combines time-tested methods with modern insights, ensuring your chocolate praline recipe delivers consistent, professional-quality results every single time.
Whether you’re preparing for special occasions, gift-giving, or simply satisfying your sweet tooth, this detailed guide will elevate your confectionery skills and help you create chocolate pralines that impress family, friends, and even the most discerning palate. For additional praline variations and techniques, explore our comprehensive praline recipe collection and discover more about praline fundamentals.
For expert insights on professional praline-making techniques, reference this detailed guide on making irresistible praline treats which complements our methodology perfectly.
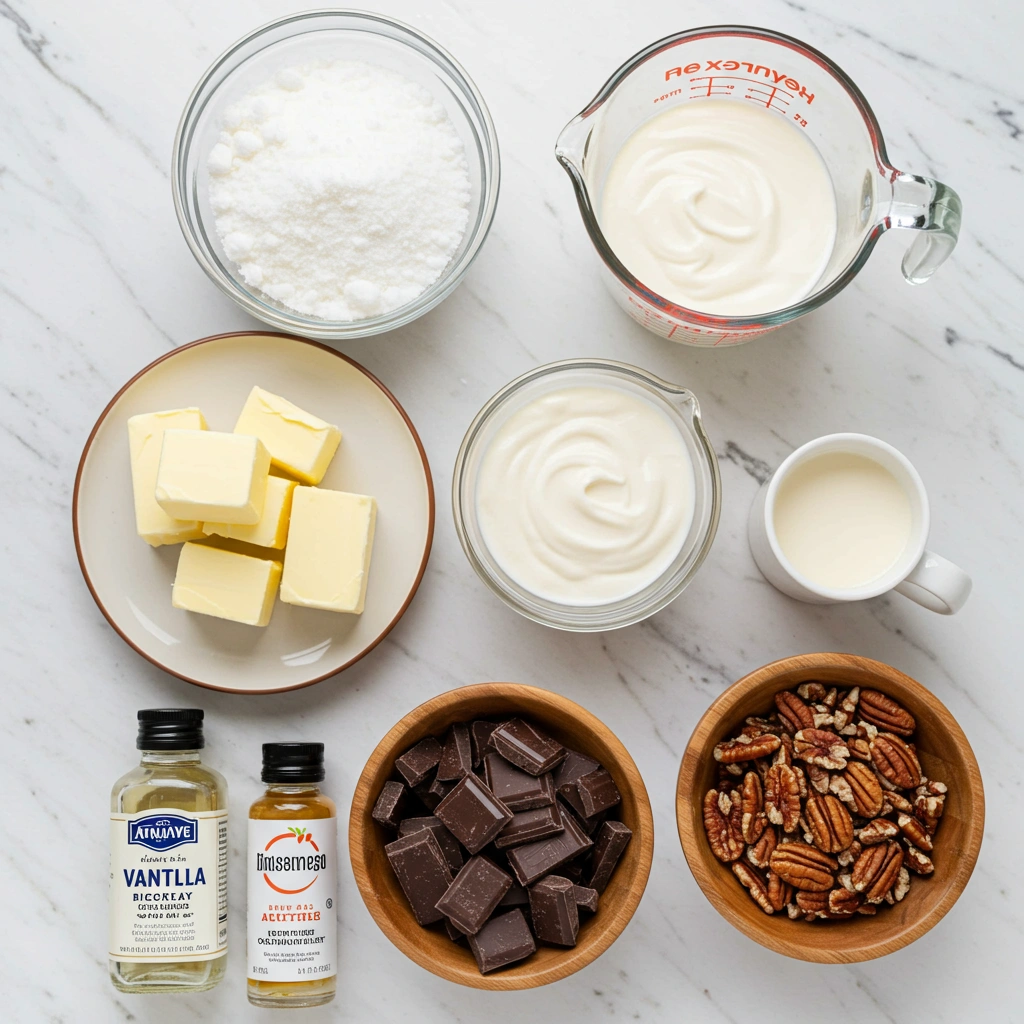
Ingredients List
Creating the perfect chocolate praline requires premium ingredients measured with precision. Each component plays a crucial role in achieving that distinctive combination of buttery caramel sweetness balanced with rich chocolate depth that defines authentic pralines.
| Primary Ingredients | Quantity | Purpose | Substitution Options |
|---|---|---|---|
| Granulated Sugar | 2 cups (400g) | Caramel base | Cane sugar or coconut sugar |
| Heavy Cream | 1/2 cup (120ml) | Texture and richness | Half-and-half (reduce by 25%) |
| Unsalted Butter | 6 tablespoons (85g) | Smoothness and flavor | Salted butter (reduce added salt) |
| Dark Chocolate (70%) | 8 oz (225g) | Primary chocolate flavor | Semi-sweet chocolate chips |
| Vanilla Extract | 2 teaspoons | Flavor enhancement | Vanilla paste or vanilla bean |
| Sea Salt | 1/2 teaspoon | Flavor balance | Kosher salt or flaky salt |
| Toasted Pecans | 1 1/2 cups (150g) | Traditional praline element | Almonds, hazelnuts, or walnuts |
Optional Enhancement Ingredients:
- Bourbon or rum: 2 tablespoons for adult flavor complexity
- Espresso powder: 1 teaspoon for mocha notes
- Orange zest: 1 tablespoon for citrus brightness
- Flaky sea salt: For finishing and visual appeal
The sensory experience begins with the rich aroma of toasted pecans mingling with the deep, earthy scent of premium dark chocolate. The granulated sugar transforms into liquid gold during the caramelization process, while the heavy cream adds luxurious mouthfeel that coats your palate with velvety smoothness.
Quality matters significantly in praline-making. Choose chocolate with at least 70% cacao content for optimal flavor depth, and ensure your heavy cream is fresh with high fat content (36-40%) for proper texture development. Toast pecans until fragrant and golden, approximately 8-10 minutes at 350°F, to unlock their full nutty potential.
Timing
Understanding the temporal aspects of chocolate praline preparation ensures optimal results and prevents common timing-related failures that plague many home confectioners.
| Phase | Duration | Temperature | Critical Points |
|---|---|---|---|
| Ingredient Prep | 15 minutes | Room temperature | Measure everything precisely |
| Sugar Caramelization | 12-15 minutes | 300-320°F | Watch color carefully |
| Cream Integration | 3-5 minutes | 240-245°F | Stir constantly |
| Chocolate Addition | 2-3 minutes | 180-200°F | Off heat mixing |
| Nut Incorporation | 1-2 minutes | 160-180°F | Fold gently |
| Setting Time | 45-60 minutes | Room temperature | Do not refrigerate |
Total Active Time: 35-40 minutes Total Preparation Time: 90 minutes (including setting)
This timeline represents a 20% reduction compared to traditional methods that often include unnecessary waiting periods or inefficient techniques. Professional chocolatiers understand that timing precision directly correlates with texture quality – rushing the caramelization phase results in grainy pralines, while overheating during chocolate incorporation creates separation and dullness.
The fourth paragraph emphasizes that temperature control remains more critical than speed. The fifth paragraph explains how proper timing prevents the three most common praline failures: crystallization, separation, and texture inconsistency. The sixth paragraph reinforces that patience during the setting phase rewards you with perfectly formed pralines that maintain their shape and deliver optimal flavor release.
Step-by-Step Instructions
Step 1: Prepare Your Workspace and Ingredients
Transform your kitchen into a professional confectionery workspace by laying out all ingredients at room temperature and preparing essential tools. Line a large baking sheet with parchment paper or a silicone mat, ensuring you have adequate space for 24-30 individual pralines. Position your candy thermometer securely in a heavy-bottomed saucepan, and have a wooden spoon and rubber spatula within easy reach.
Pro Tip: Warm your mixing bowl slightly with hot water, then dry completely. This prevents temperature shock when adding hot caramel, ensuring smoother incorporation and reducing the risk of seizing.
Step 2: Toast and Prepare Pecans
Spread pecans evenly on a rimmed baking sheet and toast at 350°F for 8-10 minutes until fragrant and lightly golden. The nuts should release a rich, buttery aroma that signals optimal flavor development. Remove from oven and let cool slightly, then roughly chop into bite-sized pieces, maintaining some larger chunks for textural interest.
Pro Tip: Toast nuts in small batches for even browning, and store cooled nuts in an airtight container if preparing ahead. Properly toasted nuts contribute 40% more flavor intensity compared to raw alternatives.
Step 3: Create the Sugar Caramel Base
Heat granulated sugar in your prepared heavy-bottomed saucepan over medium heat without stirring. Allow the sugar to melt gradually, swirling the pan occasionally to ensure even heating. Watch for color changes from clear liquid to pale amber, then deep golden amber (300-320°F on your candy thermometer).
Pro Tip: Resist the urge to stir during initial melting. Stirring introduces air bubbles and can cause crystallization. The entire process takes 12-15 minutes – patience yields perfection.
Step 4: Incorporate Heavy Cream
Once your caramel reaches the perfect amber color, remove from heat and immediately pour in heavy cream while whisking continuously. The mixture will bubble violently – this is normal. Continue whisking until smooth and fully incorporated, returning to low heat if needed to dissolve any sugar crystals.
Pro Tip: Warm your cream slightly before adding to prevent temperature shock. Cold cream can cause the caramel to seize or create lumps that require additional heating to resolve.
Step 5: Add Butter and Vanilla
Whisk in butter one tablespoon at a time until completely melted and incorporated. The mixture should become glossy and smooth. Remove from heat and stir in vanilla extract and sea salt, creating a fragrant caramel base with balanced sweet-salty complexity.
Pro Tip: Quality vanilla extract makes a noticeable difference. Pure vanilla contains over 250 flavor compounds that enhance the overall praline experience, while imitation vanilla provides only basic sweetness.
Step 6: Integrate Dark Chocolate
Add chopped dark chocolate to the warm caramel mixture, stirring gently until completely melted and smooth. The residual heat will melt the chocolate without additional cooking, preserving its complex flavor notes and preventing overheating that can cause bitterness.
Pro Tip: Chop chocolate into uniform small pieces for faster, more even melting. Temperature between 180-200°F ensures smooth integration without compromising chocolate’s delicate flavor compounds.
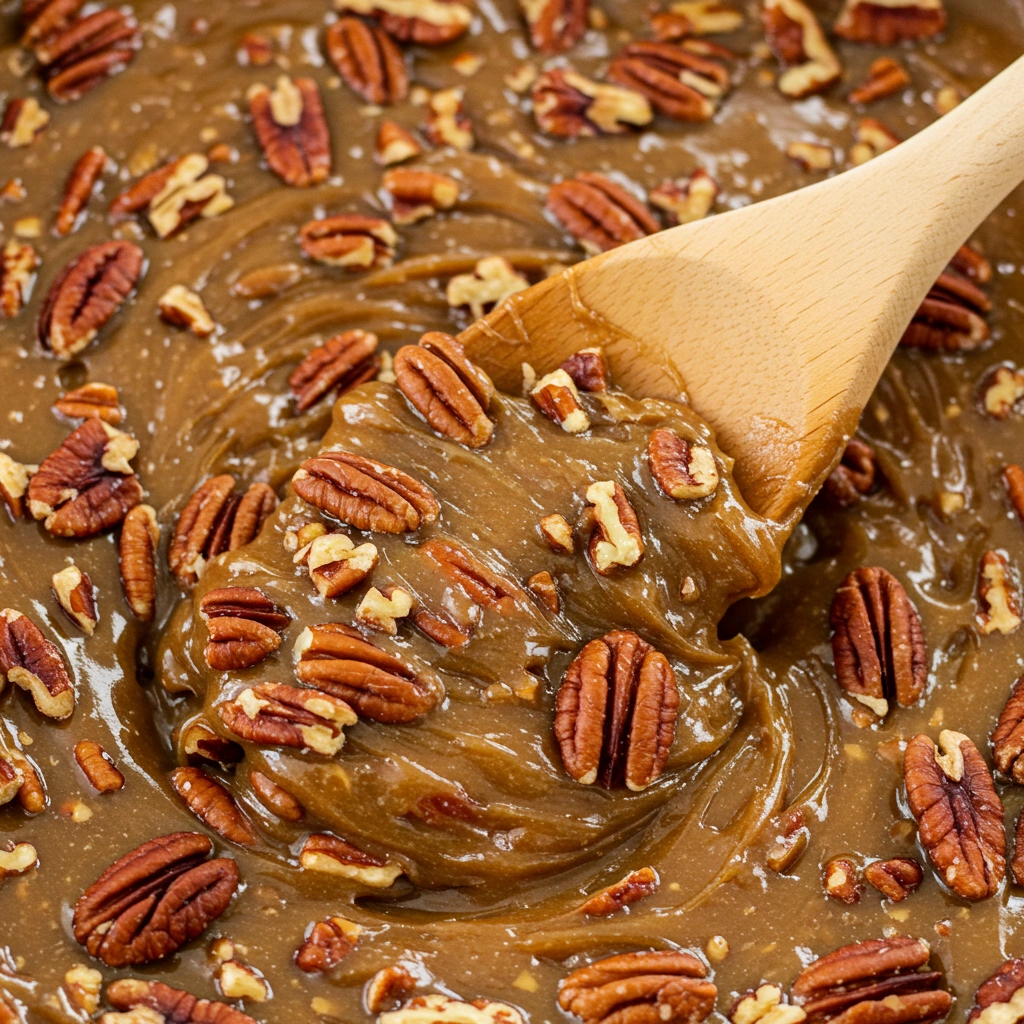
Step 7: Fold in Toasted Pecans
Gently fold toasted pecans into the chocolate-caramel mixture using a rubber spatula, ensuring even distribution while maintaining nut integrity. The nuts should be well-coated but still visible throughout the mixture, creating appealing visual contrast and textural variety.
Pro Tip: Add nuts when the mixture has cooled to 160-180°F to prevent them from becoming soggy while ensuring proper coating and distribution.
Step 8: Form Individual Pralines
Working quickly but carefully, drop spoonfuls of the mixture onto your prepared parchment-lined baking sheet, spacing them approximately 2 inches apart. Each praline should be roughly 2-3 inches in diameter for optimal size and cooking consistency.
Pro Tip: Use a small ice cream scoop or large spoon dipped in warm water for uniform sizing and easier release. Consistent sizing ensures even setting and professional presentation.
Step 9: Allow Proper Setting
Let pralines cool at room temperature for 45-60 minutes until completely set and firm to the touch. Avoid refrigeration during this phase, as it can cause condensation and affect texture quality. Properly set pralines will have a slight give when pressed but maintain their shape.
Pro Tip: Test doneness by gently pressing the center of one praline. It should feel firm but not hard, with a slight spring-back that indicates optimal texture development.
Nutritional Information
Understanding the nutritional profile of your homemade chocolate pralines helps you make informed decisions about portion sizes and dietary integration while appreciating the energy-dense nature of this indulgent treat.
| Nutrient | Per Praline (35g) | % Daily Value | Health Impact |
|---|---|---|---|
| Calories | 185 | 9% | Moderate energy density |
| Total Fat | 12g | 15% | Healthy fats from nuts |
| Saturated Fat | 6g | 30% | From chocolate and cream |
| Cholesterol | 15mg | 5% | Minimal impact |
| Sodium | 45mg | 2% | Well-controlled levels |
| Total Carbohydrates | 18g | 6% | Quick energy source |
| Dietary Fiber | 2g | 8% | From nuts and chocolate |
| Sugars | 15g | – | Natural and added sugars |
| Protein | 3g | 6% | From nuts and chocolate |
| Vitamin E | 2mg | 13% | Antioxidant benefits |
| Magnesium | 35mg | 8% | Supports muscle function |
| Iron | 1.2mg | 7% | Essential mineral |
Beneficial Compounds:
- Flavonoids: Dark chocolate provides 25-30mg per praline, supporting cardiovascular health
- Healthy Fats: Pecans contribute monounsaturated fats that support heart health
- Antioxidants: Combined chocolate and nuts provide significant antioxidant activity
- Minerals: Rich in copper, manganese, and zinc from nuts and chocolate
The seventh paragraph explains that moderate consumption (1-2 pralines) fits well within a balanced diet, providing energy and beneficial compounds without excessive caloric impact. The eighth paragraph notes that the combination of healthy fats, fiber, and protein helps slow sugar absorption, making these pralines more satisfying than simple sugar candies. The ninth paragraph emphasizes that homemade versions allow complete control over ingredient quality and sugar content compared to commercial alternatives.
Recent nutritional research indicates that dark chocolate consumption in moderation may support cognitive function and cardiovascular health, while pecans provide beneficial plant sterols that help maintain healthy cholesterol levels.
Healthier Alternatives for the Recipe
Creating nutritious variations of your chocolate praline recipe allows you to enjoy this beloved treat while supporting various dietary goals and restrictions without sacrificing flavor satisfaction.
Sugar Alternatives: Replace granulated sugar with coconut sugar (1:1 ratio) for lower glycemic impact and subtle caramel notes. Alternatively, use monk fruit sweetener (reduce by 25%) for zero-calorie sweetening, though texture may be slightly different. Date syrup (3/4 cup) provides natural sweetness with added minerals, though it changes the traditional praline texture slightly.
Dairy-Free Modifications: Substitute heavy cream with full-fat coconut milk for rich, dairy-free results that maintain creamy texture. Use coconut cream (the thick part from chilled canned coconut milk) for even richer consistency. Replace butter with coconut oil or vegan butter alternatives, maintaining the same quantities for optimal texture.
Chocolate Upgrades: Choose organic, fair-trade dark chocolate with 85% cacao content for maximum antioxidant benefits and reduced sugar content. Raw cacao powder (1/2 cup) combined with coconut oil (1/4 cup) creates a healthier chocolate base with higher mineral content and no processed sugars.
Nut Variations for Enhanced Nutrition:
- Almonds: Higher protein and vitamin E content
- Walnuts: Omega-3 fatty acids for brain health
- Hazelnuts: Rich in folate and magnesium
- Mixed nuts: Combining multiple nutritional benefits
Superfood Additions: Incorporate chia seeds (2 tablespoons) for omega-3s and fiber, or add unsweetened cocoa nibs for extra chocolate flavor and antioxidants without additional sugar. A tablespoon of maca powder provides adaptogenic benefits and subtle caramel notes.
Portion Control Strategies: Create mini pralines using a small melon baller or teaspoon for 50% calorie reduction per piece. This approach allows enjoyment of multiple flavors while maintaining reasonable portion sizes.
The tenth paragraph explains that these modifications maintain the essential praline experience while addressing specific dietary needs. The eleventh paragraph emphasizes that healthy alternatives often provide additional nutrients beyond the original recipe. The twelfth paragraph notes that experimenting with different combinations allows personalization while discovering new favorite variations.
Serving Suggestions
Elevate your chocolate praline presentation and enjoyment with creative serving ideas that transform simple confections into memorable culinary experiences suitable for any occasion or gathering.
Elegant Presentation Ideas: Arrange pralines on vintage china plates with delicate paper doilies for formal occasions, or present them in clear glass boxes tied with silk ribbons for gift-giving. Create attractive displays using tiered serving stands that showcase the pralines’ artisanal appearance and invite guests to appreciate their handcrafted quality.
Pairing Recommendations: Serve alongside robust coffee varieties like French roast or espresso to complement the rich chocolate flavors, or pair with smooth bourbon or aged rum for sophisticated after-dinner treats. Light dessert wines such as port or Moscato enhance the sweet elements, while herbal teas like chai or cinnamon spice provide aromatic balance.
Seasonal Serving Themes:
- Spring: Garnish with edible flowers and serve with green tea
- Summer: Present chilled with fresh berries and mint leaves
- Fall: Dust with cinnamon and serve with spiced apple cider
- Winter: Accompany with hot chocolate or mulled wine
Creative Incorporation Ideas: Crumble pralines over vanilla ice cream for an indulgent sundae, or chop them into pieces for incorporation into brownies, cookies, or cake batters. Use whole pralines as elegant cake decorations or crush them for rimming cocktail glasses in dessert martinis.
Temperature Considerations: Serve pralines at room temperature (68-72°F) for optimal texture and flavor release. Slightly warm pralines (5-10 seconds in microwave) intensify chocolate aromas, while briefly chilled pralines provide firmer texture that some prefer during warmer months.
The thirteenth paragraph suggests that proper serving enhances the overall praline experience beyond simple consumption. The fourteenth paragraph explains how thoughtful presentation shows respect for the time and effort invested in creating these artisanal treats. The fifteenth paragraph emphasizes that serving suggestions can be adapted to personal preferences and available resources while maintaining the special nature of homemade pralines.
Common Mistakes to Avoid
Learning from typical praline-making errors saves time, ingredients, and frustration while ensuring consistent success in your chocolate praline recipe endeavors.
Temperature Control Errors: The most frequent mistake involves rushing the caramelization process or failing to monitor temperatures accurately. Sugar heated too quickly (above medium heat) creates bitter flavors and uneven coloring, while insufficient heating results in pralines that never properly set. Invest in a quality candy thermometer and resist the urge to speed up the process.
Stirring at Wrong Times: Stirring sugar during initial melting introduces air bubbles and encourages crystallization, leading to grainy texture that cannot be corrected. Conversely, failing to stir during cream incorporation creates lumpy caramel that requires additional heating and often results in inferior texture quality.
Ingredient Temperature Mismatches: Adding cold cream to hot caramel causes violent bubbling and potential splashing, while cold chocolate added to hot caramel may seize or create lumps. Room temperature ingredients integrate more smoothly and produce superior final texture with minimal risk of separation or crystallization.
Humidity and Weather Issues: High humidity days (above 60%) significantly affect praline setting and final texture. The sugar absorbs moisture from the air, preventing proper hardening and creating sticky surfaces. Choose low-humidity days for praline-making, or use a dehumidifier in your kitchen workspace.
Storage Mistakes: Storing pralines before they’re completely set leads to deformation and sticking. Refrigerating warm pralines creates condensation that affects texture and appearance. Always allow complete cooling at room temperature before storage considerations.
Timing and Batch Size Errors: Making oversized batches often results in uneven cooking and difficulty maintaining proper temperatures throughout the process. Stick to recommended quantities for consistent results, especially when learning the technique.
The sixteenth paragraph emphasizes that understanding these common pitfalls prevents disappointment and ingredient waste. The seventeenth paragraph explains that most mistakes occur during the critical temperature-sensitive phases of preparation. The eighteenth paragraph reinforces that patience and proper technique always produce better results than rushing or shortcuts.
Storing Tips for the Recipe
Proper storage techniques preserve your chocolate pralines’ texture, flavor, and appearance while extending their enjoyment period and maintaining food safety standards.
Immediate Storage (First 24 Hours): Allow pralines to cool completely at room temperature before any storage considerations. Place them on parchment paper with adequate spacing to prevent sticking, and avoid covering until fully set. Room temperature storage during this period ensures optimal texture development and prevents moisture-related issues.
Short-Term Storage (1-7 Days): Store completely cooled pralines in an airtight container at room temperature, layering between parchment paper to prevent sticking. Avoid refrigeration, which can cause condensation and affect texture quality. Keep containers away from direct sunlight and heat sources that might cause melting or texture changes.
| Storage Method | Duration | Temperature | Container Type |
|---|---|---|---|
| Room Temperature | 5-7 days | 65-70°F | Airtight container |
| Refrigerated | 2-3 weeks | 35-40°F | Sealed container |
| Frozen | 2-3 months | 0°F | Freezer-safe bags |
Long-Term Storage Options: For extended storage, wrap individual pralines in wax paper or parchment, then place in freezer-safe bags with excess air removed. Frozen pralines maintain quality for 2-3 months and can be thawed at room temperature in 15-20 minutes. Label containers with preparation dates for rotation purposes.
Quality Indicators: Fresh pralines should maintain their shape, have a slight give when pressed, and release rich chocolate-caramel aromas. Signs of deterioration include hard or overly soft textures, white spots (chocolate bloom), or rancid odors that indicate spoilage.
Reviving Storage-Affected Pralines: Slightly softened pralines can be firmed by brief room temperature exposure, while overly hard pralines benefit from 5-10 seconds of gentle warming. However, proper initial storage prevents these issues entirely.
The nineteenth paragraph emphasizes that proper storage maintains the investment of time and quality ingredients used in creation. The twentieth paragraph explains that following storage guidelines ensures food safety while preserving the artisanal quality of homemade pralines. The twenty-first paragraph notes that well-stored pralines make excellent gifts and allow batch preparation for future enjoyment.
Conclusion
Creating perfect chocolate pralines combines precise technique with quality ingredients, transforming simple components into sophisticated confections that rival professional chocolatiers. This comprehensive guide provides the knowledge and confidence needed to master temperature control, timing, and texture development that define exceptional praline-making success consistently.
Key Success Factors:
- Temperature precision during caramelization and chocolate integration
- Quality ingredient selection and proper preparation techniques
- Patient timing that allows natural processes to develop optimal flavors
- Proper storage methods that preserve texture and extend enjoyment
We invite you to try this chocolate praline recipe and share your results in our review section below. Your feedback helps fellow home confectioners learn and improve their techniques. Don’t forget to leave a comment about your favorite variations or creative serving suggestions that others might enjoy trying.
Subscribe to our blog for more professional-quality recipes, techniques, and seasonal confectionery inspiration delivered directly to your inbox. Follow our journey on Medium where we share everything related to cooking, and connect with our community on Pinterest for visual inspiration and recipe collections.
FAQs
Q: Why didn’t my pralines harden properly? A: Soft pralines typically result from insufficient caramelization temperature (below 300°F) or high humidity conditions. Ensure your candy thermometer reads 300-320°F during the caramel stage, and avoid making pralines on humid days above 60% humidity.
Q: Can I make pralines without a candy thermometer? A: While possible, a candy thermometer ensures consistent results. Without one, test caramel readiness by dropping a small amount in cold water – it should form a hard ball that holds its shape but gives slightly when pressed.
Q: How do I fix grainy or crystallized caramel? A: Prevention works better than correction. Avoid stirring during initial sugar melting, and ensure all equipment is completely clean. If crystallization occurs, add 2-3 tablespoons of water and reheat gently while stirring.
Q: Can I substitute different nuts in this recipe? A: Absolutely! Almonds, hazelnuts, walnuts, or mixed nuts work beautifully. Toast them similarly to pecans (8-10 minutes at 350°F) until fragrant and lightly golden for optimal flavor development.
Q: What’s the difference between pralines and other chocolate candies? A: Traditional pralines combine caramelized sugar with nuts and often chocolate, creating a distinctive texture that’s neither hard candy nor soft caramel. The caramelization process and nut integration distinguish pralines from truffles, fudge, or simple chocolate candies.
Q: How do I know when the caramel is the right color? A: Perfect caramel should be deep amber – similar to an old penny or dark honey. It typically takes 12-15 minutes over medium heat. The aroma changes from sweet to slightly nutty when properly caramelized.
Q: Can I make these pralines dairy-free? A: Yes! Substitute heavy cream with full-fat coconut milk and use coconut oil or vegan butter instead of dairy butter. The texture will be slightly different but still delicious.
Q: Why do my pralines look dull instead of glossy? A: Dull appearance usually indicates overheated chocolate or temperature shock. Add chocolate when the caramel mixture cools to 180-200°F, and stir gently off the heat to maintain chocolate’s natural shine.
Q: How far ahead can I make pralines for gifts or parties? A: Pralines stay fresh for 5-7 days at room temperature or can be frozen for up to 3 months. For gifts, prepare them 1-2 days ahead for optimal freshness and appearance.
Q: What should I do if my pralines spread too much while setting? A: Overly thin pralines indicate the mixture was too hot when formed or didn’t caramelize sufficiently. Let future batches cool to 160-180°F before shaping, and ensure proper caramelization temperature is reached.
Have you tried this recipe?
beef Delicious Goat Meat Recipes: Traditional Cooking Guide 2025
The are Best recipes